There are a few key considerations to make when using a yoga roller on your back. First of all, you must never place the roller lower than mid-back. This is because you cannot control the roller if you’re on your lower back. You also won’t protect your liver and kidneys by using a roller on your lower back. So, it’s important to follow the instructions and the safety guidelines provided on the yoga roller’s label.
Lower back
When you are suffering from low back pain, use a foam roller. These foam rollers are made of a special material that helps the muscles in your lower back release tight and knotted muscles. This technique is also beneficial for relieving muscle soreness following exercise. Foam rolling exercises also help prevent injury to muscle tissue. The foam rollers range in length and firmness, and some have unique textures. You may want to buy a foam roller that has ridges on it for extra comfort.
To use a foam roller, start by placing it under your buttocks. Keep one foot on the ground and your other foot over your right knee. Use your other hand to support your body. Roll the roller down your left thigh, and exhale as you do so. Repeat the process 8-10 times to work your core muscles. The roller will release the tight muscles in the lower back and align the spine.
Start by placing the roller underneath your hips, and then lean slightly forward, extending your legs as far as possible. Engage your belly muscles while holding this position to avoid overarching your lower back. Once you have the right hip and body alignment, you can proceed to the next step. The next step is to hold the pose for a few minutes to get the full benefit of the yoga roller. It’s best to repeat the exercises eight to ten times in a row.
Start with the bridge position. Place the foam roller beneath your tailbone. Tilt your pelvis back and forth while rolling your tailbone. This will release any tightness in the area. You can also use the foam roller to massage tender spots in your lower back. Once you have mastered the pose, you can move the foam roller around various parts of the tailbone. This massage technique is great for relieving tight muscles and improving balance.
While applying foam roller therapy to your lower back, you should be very careful not to press your kidneys or liver. This is because the pressure from the foam roller can be detrimental to them. The lower back region is particularly sensitive, and a foam roller could harm them. And if you do get hurt while using the foam roller, you should be sure that it’s not your back and ribs. That’s why you should be very careful when using the yoga roller.
Mid-back
It is important to note that you should never roll your yoga roller lower than your mid-back. This is because you cannot control the roller if it is below your mid-back. Additionally, rolling it below your mid-back can put strain on your liver and kidneys. So, it is important to keep it between your shoulder blades. Using a roller at this level is a great way to work out your mid-back and prevent low back pain.
When using a yoga roller on your mid-back, be sure to focus on staying relaxed while rolling. Also, avoid rolling your low back or neck. If you are having trouble with this area, you can stop rolling and perform a thoracic pivot stretch. This is an effective exercise for relieving tension in your mid-back and glutes. Once you feel that the exercise is working, repeat.
Another excellent stretch to perform with a yoga roller is to roll the hips. Start below the armpit and roll the roller down until it reaches your mid-back. Repeat this exercise at least four times. For a more effective massage, repeat the stretching process with the other side. When you feel your muscles are relaxed and aligned, your posture will improve. The shoulder roller is especially helpful when you’ve been sitting for a long time.
Once you’ve mastered the thoracic roll, you can begin a foam roller stretch. Start by placing the roller underneath your shoulder blades. Then, slowly roll the roller side to side across the shoulder blades. Be sure to focus on the muscles of your mid-back as you push down on the foam roller. Do this for five minutes on each side. This is an excellent stretch to improve the mobility of the muscles in the mid-back.
When you perform this stretch, it is important to make sure that you don’t cause yourself any additional discomfort. If you are experiencing lower back pain, see your physiotherapist before performing this stretch. You may need to modify the stretch. As always, do not stretch beyond your comfort level. Use a foam roller only if you feel safe and comfortable. Also, don’t perform foam roller stretch if you have low back pain.
Sides of calf
To start, you should place the foam roller under one leg and place the other leg over it. Then, roll the foam roller up and down the outside of the calf muscle and any tender spots. Do this for about 30 seconds. Make sure to roll slowly and evenly to help avoid causing pain. This exercise should be performed with the foot flexed. For a more challenging version, you can put a peanut ball on a yoga block.
After massaging the long head of your calf with the foam roller, you can move on to the short head of the calf. The short head release of the calf requires a smaller range of motion and should be performed after massaging the long head. The goal is to massage the calf without tickling the muscles. Remember that calf muscles often get neglected in the area where they attach to the knee.
To use a foam roller on the sides of the calf, place the foam roller under the calf. Bend your knee and place your other foot on the floor. While holding the foam roller underneath the calf, roll it upward and down the muscle. Stop at any tender spot. You can use your arms to apply more pressure or switch legs. This will work wonders for your calf muscles.
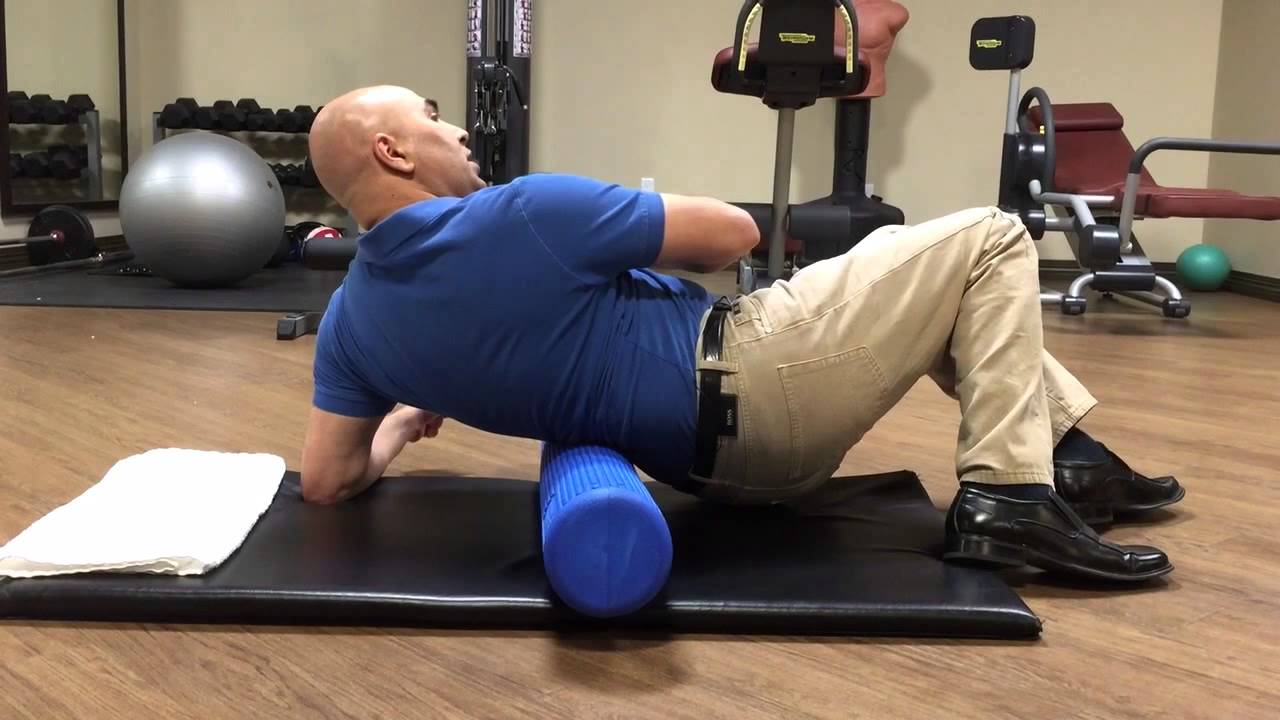
Gluteus maximus
When using a yoga roller on your back, you can use it to target the Gluteus maximus, a muscle in the lower back that provides stability and strength. Using the yoga roller in this position can help you feel the benefits quickly and safely. To start, place it horizontally on your back. Cross your right leg over your left knee and bend your left knee slightly in the shape of a number four. Hold your left foot flat on the floor and use your right hand behind you to steady yourself. Repeat this exercise on the other side.
The iliotibial band is a common problem area for many exercisers. To target this area, place the roller under the lowermost leg. Bend the upper leg slightly so that you reduce the pressure and focus on the hot spots. Repeat the same exercise on the other side. Ideally, you should use the roller on the entire upper thigh, not just the gluteus maximus.
You can also roll the gluteus while sitting. You can do this with your knees bent and your arms supporting your upper body. You should cross your left ankle over your right knee and roll your gluteus maximus while maintaining the right posture. Repeat the exercise on the opposite side. Once you’ve done this, you can then perform this exercise on your back and you should feel some relief.
You can also use a foam roller for relief of back pain. Place the foam roller beneath your armpit. Make sure that your elbows are flat on the floor. When using a yoga roller, you should make sure to place it underneath your shoulder blades. Try moving the roller in a smooth sweeping motion and relax. Then repeat it on the other side. Your body should feel better in just a few days.